Before I had even completed the bare naked King Super 20 alto restoration seen in my projects section, the horn’s owner decided he had to have a matching tenor of the same vintage. After he played the finished 313xxx alto, it was a done deal.
It took me a little while to find just the right King Super 20 tenor. It was a 315xxx player’s horn. It had less than 50% lacquer as well as significant battle scars. We later discovered the bell had been pushed back and twisted. Plus the body tube was bent which meant most of the rods were tweaked as well. The pads were shot but the horn still put out a wicked big sound in spite of it. Needless to say, I was psyched about the potential.
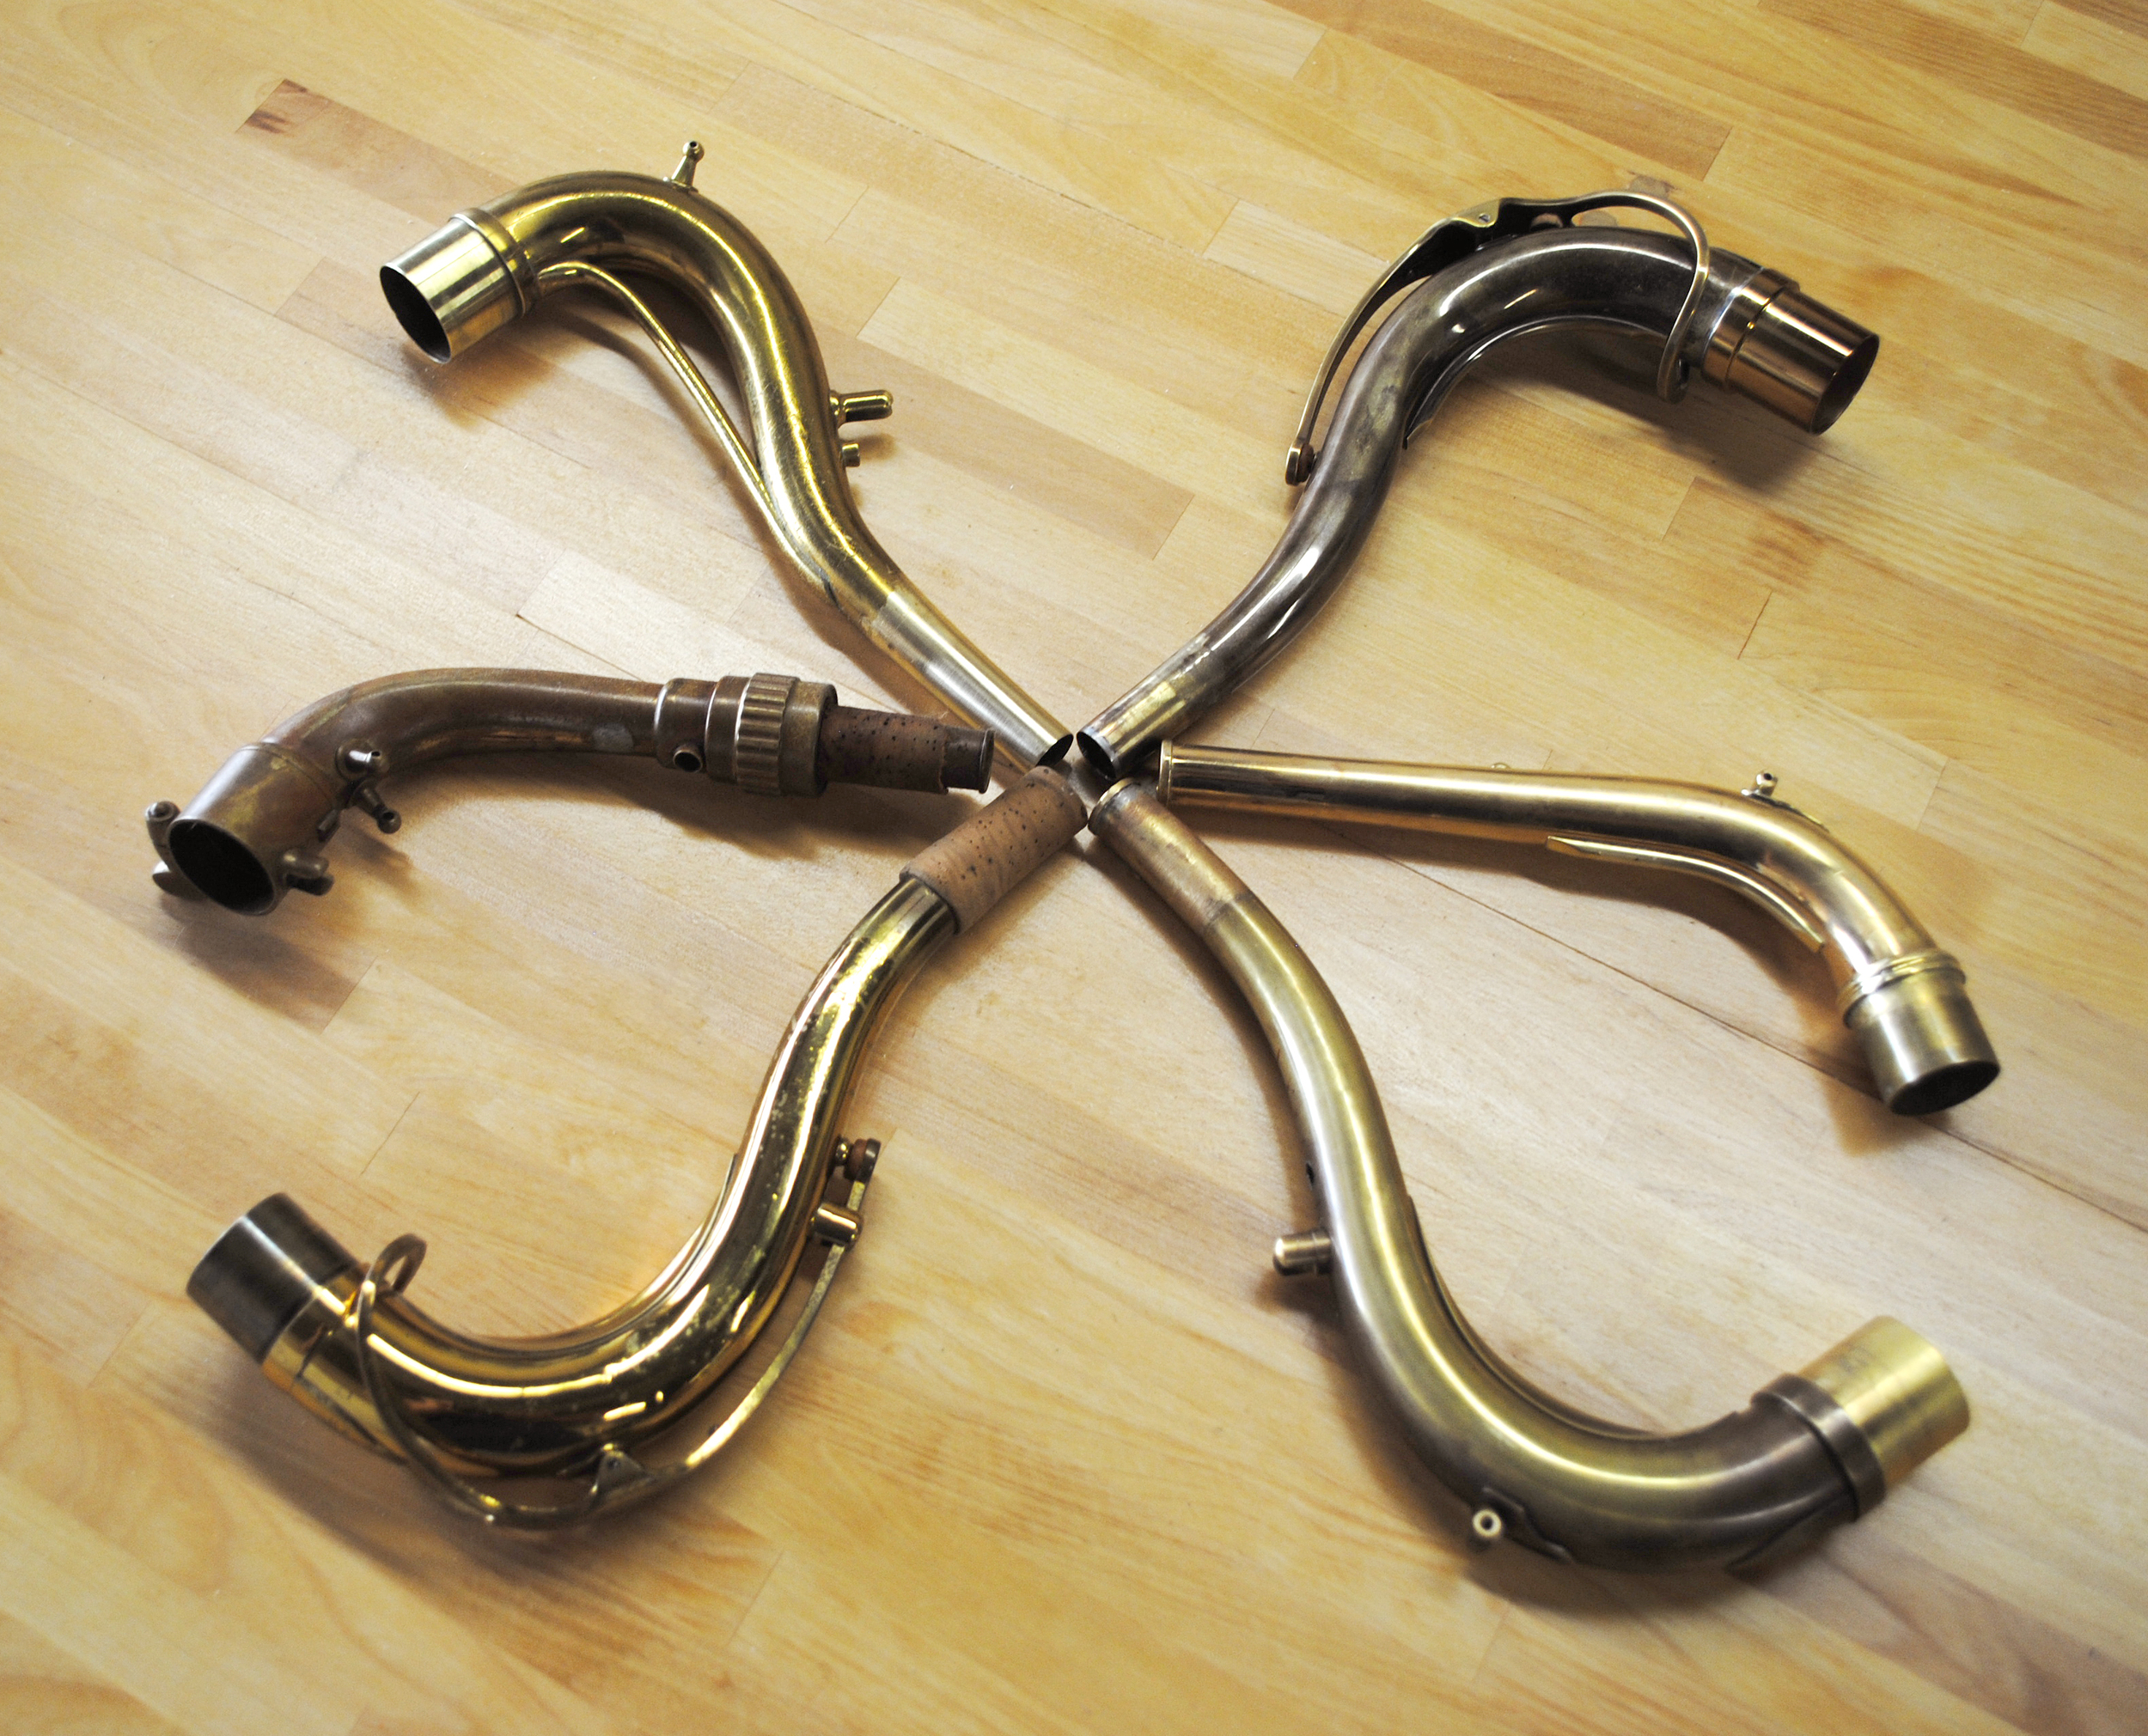
We followed the same process as with the alto. The original engraving was all painstakingly re-traced by Sherry Huntley at Artistic Engraving and she also added the extra original engraving design to the bow and C, C# and Eb pad cups. Then the bare naked stripping process began. It’s a chemical process and a buffing wheel is simply not used.
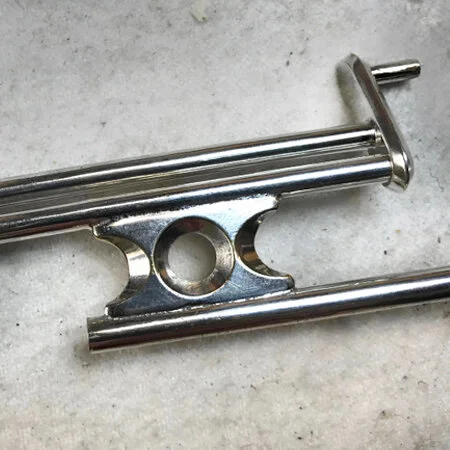
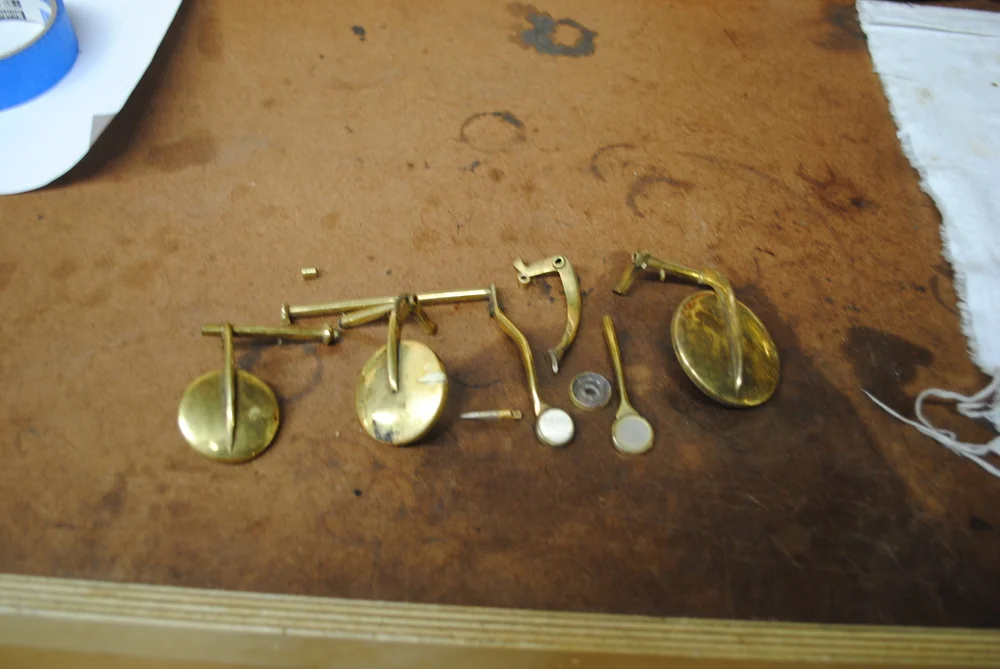
The dent work included a bell flare that looked like a head of broccoli from repeatedly hitting a mic and the rest of the sax had its fair share of bumps. There was re-soldering of key guards and lots of fine tuning of rods, posts and pad cups. We used Pisoni Pro pads and went with oversized flat nickel resonators.
The setup is wide open and this tenor really screams. What a sound. The bare naked finish truly allows it to vibrate. Yet it is still so rich when played softly. At the end of the day, it’s a perfect match to the 313 alto and I have one very happy customer.
Learn more about the benefits of stripping.
In 1932 Selmer had a “cigar cutter” shaped octave mechanism on their SSS (Selmer Super Saxophone) saxophones. However, the design was changed fairly quickly because of a patent infringement.
This particular Cigar Cutter tenor came from England and made its way to its current owner. The original silver plating was about 95%+ and the body and neck were remarkably straight. It has a two-tone finish and marvelous engraving on both the bell and bow.
The hardest part of this restoration was removing the tarnish. It took four passes with Hagerty’s silver polish – close to 90 years of oxidation and grunge just didn’t want to let go. But, as you can see, it did. I used Pisoni professional pads and oversized, slightly-domed, nickel resonators. A little silver touch-up took this tenor to 99%+.
The sound is really fabulous. It has that old-school vibe, but it still has an edge. These tenors are notorious for having sharp low B and Bb keys. I helped out by making and installing crescents (silver plated of course) to eliminate some of the work for the player. The keywork feels surprisingly modern compared to other brands of the same time period.
I just love the Super, Cigar Cutter and Radio Improved tenors. In fact, they’re hard to beat.
After looking for over five years, my customer finally found it. An original Gale Hollywood mouthpiece to go with his Conn Transitional baritone. The only downside was that it had an epoxied crack in the shank. The sound was phenomenal but pushing it onto the neck cork was beyond nerve-racking. (It’s amazing that any of these pieces remain today given how thin the hard rubber is on the shank. That’s probably why Mulligan’s piece had such a big band on it.) My goal was to machine the taper on the inside of the band to perfectly match the taper on the outside of the shank in order to provide the necessary support. An ideal blend of epoxy sealed the deal and now I have one very pleased bari player.
––––––––––
Brilhart Tonalins. Great mouthpieces. But they can crack. I have one dyed-in-the-wool Brilhart fanatic who had me create brass bands for all his pieces. As he says, “An ounce of prevention is worth a pound of cure.”
––––––––––
Biteplates. Can’t play without them. However no one wants to play a vintage piece with missing chunks of biteplate or major tooth indentations. I can custom-fit a new hard rubber biteplate to your mouthpiece. Never know it wasn’t original and it feels so much better.
Have a mouthpiece that needs attention?
Schedule an appointment.
This Saxello had been sitting apart in another shop for who knows how long. It had a butchered low Bb key that needed to be replaced. The neck had been removed at some point and was missing gold at the solder joint. It also didn’t have pads or springs. But my customer had high expectations for this instrument. There aren’t many Saxellos out there and finding one in gold made this one even more special. Part of the trick to this project would be to match the color and feel of the original gold plating on the neck joint, the new Bb key and a couple of wear spots on the body tube. In spite of those things, it looked like a pretty straightforward restoration. Turned out it was a bit more challenging.
When I got it apart, I discovered all the rods were heavily corroded from sitting exposed for so long and each one had to be cleaned and polished. The body tube was tweaked. And surprise, four of the posts became loose when I straightened the body tube and had to be re-soldered. There were only a couple of very minor dents which completely disappeared with a little persuasion. I was able to graft on a low Bb key from a similar vintage King straight soprano which worked out perfectly. We took the restoration a step farther and put in gold-plated, small, flat resonators and Pisoni pads to replace the original pads and rivets. The photos pretty much speak for themselves. It definitely was worth all the effort.
How does it play? A pure delight with an absolutely unique and wonderful sound. Nothing quite like a King Saxello. As an aside, I happened to have three of these remarkable sopranos in the shop at the same time. Plus a Buescher straight alto. Not too often you get to see a lineup like that.
There’s something very special about Coltrane era SBA tenors. The way the palm keys speak. The incredible power of the bottom end. These horns are just so expressive. This particular model was assembled in Europe. It was in lovely cosmetic condition with the silver at almost 100% and no damage anywhere. But it was missing its edge and not delivering its full potential.
Things started to change after the bell was soldered to the bow. Then, after a lengthy search, a complete set of original Selmer Tone-X metal resonators were installed on Pisoni Pro pads. That helped take it to the next level. A custom setup finished the job. Oh man. Now you’re talking.
It’s truly a joy for me to rebuild a fine vintage horn and there are so many of them out there. Each one deserves to be heard at its absolute best. This one will put a smile on anyone’s face.
I just love baritones. This one was certainly no exception. What a privilege it was to help preserve something with this historical value.
The top bow was a mess, which was compounded by the fact that Adolphe Sax horns are made from such thin gauge brass. Reforming the shapes is very tricky business. The bell flare left a bit to be desired but the final product was as true as the day it left Sax’s shop in Paris. The bell also carried incredible engraving. The challenge was to regain the beautiful curves of the form without losing the sharpness of the typography.
The poor body tube took its fair share of knocks as well. The brace was deformed and the overall oxidation had to be eliminated without compromising the super light metal. The F# tone hole had seen better days. I literally had to remove it from the body tube. After cleaning up all the decayed old lead solder and straightening the body tube, I could put it back where it belonged.
The end result is a thing of beauty and a joy to play. After all, what could feel better than a baritone that weighs less than a tenor.
See more Adolphe Sax restorations.
Let’s go back in time. To almost the very beginning, when Adophe Sax invented the saxophone in 1846. This set of horns is from before the American Civil War. It took Mark Overton years to find them for his SaxQuest Museum in St. Louis. I had the great opportunity to return this family to its original grandeur.
Challenges abounded. Adolphe Sax saxophones are made from very thin brass that is incredibly brittle and difficult to work with. In fact, it was not uncommon for the factory to crack and patch horns during original manufacturing. Because the hinge tubes are made from rolled sheet stock, swedging requires the most careful adjustment to avoid splitting them. Pad cups are much more delicate than a modern or even vintage horn.
Not disturbing the intricate engraving on the bell while removing dents was really tough, but softening the typography was not an option. I had custom white leather pads made for each horn. And of course, each sax had over 150 years of oxidation that needed to vanish.
This remarkable, preserved family can be seen at the SaxQuest Museum. It’s definitely worth the visit.
Necks are a wear point. Tips can get out of round from the stress of putting on and taking off mouthpieces. Sometimes necks get pulled down. Or damaged from a fall. There is the occasional microphone pick-up that needs to be removed. The tenon can get distorted and not seal properly. I've even had to replace the last inch of an alto neck. Regardless, a damaged neck is bad news for your sound.
The neck is the most important part of the saxophone. It’s right there at the beginning of the instrument and its role in delivering air to the rest of the horn cannot be underestimated. Each one has its own unique shape, taper, dimensions and angles. And each brand has a different approach. The only way to know what’s correct is to measure good samples – there is no book that lists all the data. Over the last two decades I have measured countless necks and have created my own library. It’s the basis for my restoration process. I never guess.
I’ve restored thousands of necks for shops and individuals. To help get the job done, I have created custom sleeves that are tapered to match factory specs perfectly. I have a set of 100 shaping balls that I use just for necks. I make things round. I replace rings. I replace tenon/receiver sets. I get the angles right. Every nuance. Every time.
It was tricky. Here was the perfect “closet horn” without a blemish. The owner loved the way it looked and truly appreciated its remarkable cosmetic condition. But he also really wanted to be able to experiece the sound that gave this classic Cleveland King Super 20 SilverSonic its reputation.
The secret sauce for this tenor was going to be slightly oversized sterling silver resonators. What else would suit the sterling neck and bell better? A set of Pisoni Pro pads completed the picture and would do the sealing for years to come.
The result? No scratches. No discolored pad cups. No marred screw heads. Perfection. And then some. Plus now it played like it was always intended to. After custom-dialing in the pad heights and spring tension, this old King blew the doors down.
Hard to believe anything with such potential could end up stranded on a driveway and then run over by an automobile. This Brecker era tenor pushed the edges of what’s possible from a restoration perspective and was perhaps the greatest overall challenge I’ve had to date.
The upper body was literally pancaked – at least when it came into the shop. Making the tube round again without overstressing the brass required painstaking manipulation and really understanding its nature. Tone holes have to be flat and true or the pads just won’t seal. Rods, posts, and key work have to fit squarely, precisely, and function perfectly.
A horn of this vintage needs to deliver an extraordinary sound. At the end of the day, it did. The transformation took enormous effort and literally took the owner’s breath away.
How do you rebuild a plastic saxophone? Very, very carefully. What seemed like a good idea for an economical, alternative material in the 1950’s presents quite an undertaking to restore today.
The plastic in the body tube of a Grafton won’t dent, but it will crack and will melt. Graftons don’t use needle springs, rather wound springs like in a watch. Lots of fun to take apart, put back together, and adjust. Spares aren’t available. Lots of patience is required. I’ve restored about a half dozen of these horns. Each time I’m relieved when they’re done.
This particular alto was a great example to save. Now it plays as good as it looks.
A saxophone that leaks at the neck does not play the way it should. This particular SML tenon and receiver was a mess. It was expanded to the point where it had cracks and was horribly out of round.
In replacing a tenon/receiver, the goal is to create an optimum fit that is perfectly round and is absolutely smooth at all transition points. The fit from the neck to the tenon and from the receiver to the body tube is stable and looks original. Soldering is touchy if you don’t want to damage existing lacquer or plating on the neck and body tube.
This SML was silver plated so I was able to plate the new pieces to match the rest of the horn perfectly before soldering. With lacquered horns, I patina the new pieces to match the horn and then apply lacquer to the tenon/receiver for as close a match as possible.
This Saxello was beautiful. It just had a really bad kink in the neck. But no worries, with a bit of persuasion and a steady approach, things were returned to the level of the rest of the instrument.
The King Saxello is a rare bird. Not many were made and it was very satisfying to have this one restored.
While this 130xxx Mark VI baritone was a great player, mechanically and cosmetically it had been around the block more than a few times. The bow guard was a disaster but a vintage replacement guard I happened to have in stock improved things dramatically.
The top bow wasn’t as sad as the bottom bow and the body tube was anything but straight and true. It leaked, the keys were loose, and the pads were shot. In short, everything needed attention.
Fitted with oversized metal resonators and premium pads, this bari turned out to be one nasty monster and made its post-rebuild debut on the hit TV show, “Louie.”
This is the front F key for a Selmer Balanced Action. It just wasn’t there when I received the horn. I had to fabricate a new one to make this saxophone whole. The patina needed to match the horn, as did the new lacquer. The rocker arm had to line up perfectly. My goal was not to make it look good. Rather to make it look absolutely original.
My customer forgot that I had to fabricate a new key when he saw the finished product. I created a new F key that blended into the existing key work. Mission accomplished.
This was one of the ugliest Series 2 King Super 20 altos I’ve ever seen. Someone had replaced the Bb/B key guard with an extended nickel plated one that covered C# as well. Which meant the guard feet had to be moved leaving bare spots in the lacquer. A really bad spot fix covered them up but filled in the gorgeous original engraving in the process. What a shame. It sure had its fair share of bumps and bruises to complement the nasty cosmetics.
But it had such a nice sound and all those pearls everywhere. Plus Cannonball played this vintage on so many great albums. I had an idea. Strip this horn and reveal the true beauty of what was underneath. Let it resonate for all its worth. Put back on the original guard. Resolder the guard feet to eliminate any body tube stress. Slip in some slightly oversized flat nickel resonators for a little extra punch. Use the best Pisoni Pro pads. It was gonna be good.
We decided to push the project just a little bit further. Since the lacquer was being chemically stripped (with absolutely not one touch of a buffing wheel), why not put the original Series 1 engraving pattern on the bow and C/C# pad cups? Sherry Huntley of Artistic Engraving did the work and it is absolutely beautiful.
The setup is pretty much wide open. With a Meyer Brothers NY 5M, this horn makes a serious statement. It’s so much fun to play. It’s so alive in your hands. And those amazing pearl palm and side keys feel so special on your fingers. I just love this horn. Cosmetically? Let’s just say it transformed into a closet horn that you can actually play without worrying about scratching the lacquer.
The owner is so happy with this project that we’ve matched it with a tenor of the same vintage.
See the finished project and get the low-down.
Learn more about the benefits of stripping.
Nothing sounds quite like an old Conn Chu Berry – especially if it’s the gold burnished Artist model. However a characteristic of this vintage is that the ergonomics aren’t particularly user-friendly. The goal with this horn was to blend a classic 1920’s sax with more modern key work and enhanced performance.
First I modified the keys for better positioning and then matched the original gold finish. I also removed the trill keys and reversed the spring. Less weight improved the ease of the action and enabled the player to get around the horn quicker. As a final step, I brought back the original lustre of the burnished gold entirely by hand.
These old horns are beautiful and have such a distinctive sound. The end result blended that incredible Conn quality with easier ergonomics.
This is one magnificent gold burnished Conn from the very early 1920’s. But the wind god on the bell was blowing up a storm because of some very ugly dents on the bell. The complete mechanical restoration included making those dents disappear. My goal was to smooth out the surface but not at the expense of the original burnished gold plating. Time, patience and just the right feel got the job done.
Some of the rods and posts on this golden beast were beyond stubborn. There was cutting, grinding and fabrication to make it come together. The finished product sounded exactly the way it should. Big. Bold. Powerful. Pure gold.
Sometimes the best offense is a good defense. This Martin Baritone Saxophone’s Eb key guard is proof positive of that. It did its job for the Eb key and for the body of the sax. Because of its sacrifice, it had to be rebuilt.
It came to me in pieces, literally. I was able to use part of the original guard, but I still had to re-create the rest of it. The goal was to have it look as though nothing had ever happened. That meant getting all the measurements and angles correct. I finished the project by silver plating the guard to match the horn. With the project completed this horn was ready for action.